
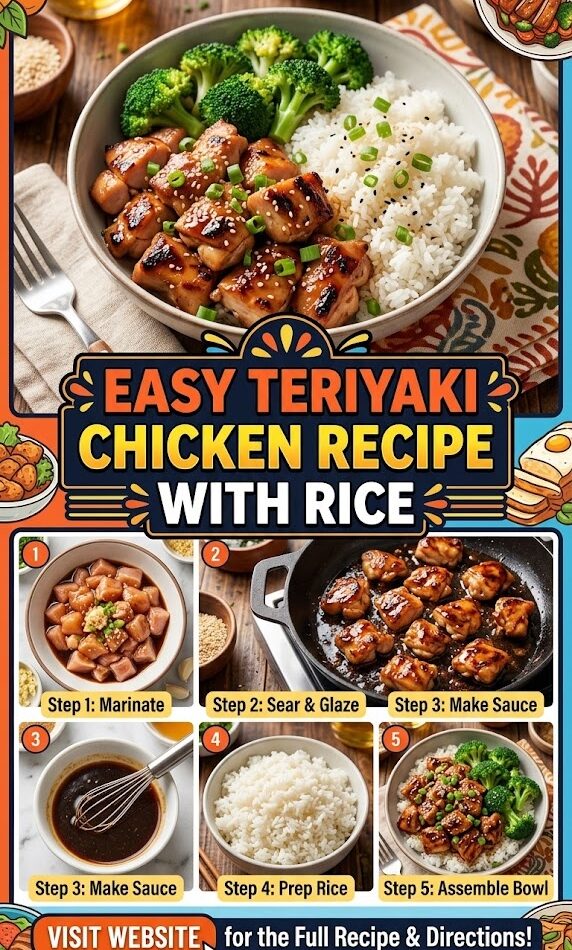
There is a reason why Teriyaki Chicken with rice is a global phenomenon. From the bustling street stalls of Tokyo to the cozy strip-mall eateries of Seattle and the high-end fusion restaurants of New York City, this dish represents the perfect marriage of salt, sugar, and umami. It is the ultimate comfort food—sweet, savory, sticky, and incredibly satisfying.
But you don’t need a passport or a delivery app to enjoy the perfect bowl of Teriyaki Chicken. In this comprehensive guide, we are going to break down everything you need to know to create a restaurant-quality meal in your own kitchen. Whether you are a novice cook looking for a reliable weeknight staple or a seasoned home chef aiming to perfect your sauce-making technique, this article provides the deep-dive knowledge necessary to master the art of Teriyaki.
The Cultural Heart of Teriyaki: A Tale of Two Traditions
To truly appreciate the recipe, we must understand its origins. The word “Teriyaki” is a combination of two Japanese words: teri, meaning luster or glaze (referring to the shine given by the sugar content in the sauce), and yaki, meaning grilled or broiled.
In traditional Japanese cuisine, Teriyaki is a cooking technique used primarily for fish, such as yellowtail or eel. The sauce is typically thin, refined, and subtle. However, the version most Americans know and love—thick, bold, and served over a mountain of white rice—has a unique history rooted in the Japanese-American experience.
In the mid-20th century, Japanese immigrants in Hawaii and the Pacific Northwest adapted the traditional glaze using locally available ingredients like pineapple juice and brown sugar. This evolution created the “Seattle-style” Teriyaki that defined a generation of quick-service dining in the United States. Today, we celebrate both the refined Japanese roots and the bold American adaptations, resulting in a dish that is as versatile as it is delicious.
Why This Easy Teriyaki Chicken Recipe is a Game Changer
In a world of complex recipes and hard-to-find ingredients, this version of Teriyaki Chicken stands out for three reasons:
- Speed: You can have a complete, balanced meal on the table in under 30 minutes.
- Control: By making your own sauce, you bypass the high sodium and artificial preservatives found in bottled versions.
- Texture: We focus on the “sear-then-glaze” method, ensuring the chicken stays juicy while the exterior achieves that iconic sticky caramelization.
Essential Ingredients: Breaking Down the Flavor Profile
The success of your Teriyaki Chicken depends on the quality and balance of your ingredients. Let’s look at what you’ll need and why each component matters.
1. The Protein: Chicken Thighs vs. Chicken Breast
While you can use either, boneless, skinless chicken thighs are the gold standard for Teriyaki. Thigh meat has a higher fat content, which means it remains tender and juicy even under the high heat required to caramelize the sauce. Chicken breast can easily become dry and stringy if overcooked by even a minute. If you must use breast meat, slice it thinly and cook it quickly to preserve moisture.
2. The Foundation: Soy Sauce
Soy sauce provides the salt and the deep umami base. For the best results, use a high-quality brewed soy sauce (like Kikkoman or Yamasa). If you are watching your sodium intake, “less sodium” soy sauce works perfectly here without compromising the flavor profile.
3. The Sweetener: Brown Sugar and Mirin
Mirin is a Japanese sweet rice wine that adds a unique depth and that signature “teri” shine. If you can’t find mirin, you can substitute it with dry sherry or white wine mixed with a teaspoon of sugar. Brown sugar adds a molasses-like richness that helps the sauce thicken into a beautiful glaze.
4. The Aromatics: Ginger and Garlic
Freshness is key here. While powdered ginger and garlic are convenient, they lack the pungent, bright bite of fresh aromatics. Freshly grated ginger provides a subtle heat that cuts through the sweetness of the sauce, while minced garlic adds an essential savory layer.
5. The Thickener: Cornstarch Slurry
To get that thick, luscious consistency that clings to every piece of chicken, a cornstarch slurry (cornstarch mixed with cold water) is your best friend. It acts as the bridge between a thin marinade and a professional-grade glaze.
Step-by-Step Instructions for Perfect Teriyaki Chicken
Phase 1: Preparing the Rice
A common mistake is starting the chicken before the rice. Since rice takes the longest to cook, start it first so it can steam and rest while you prepare the main event.
- Rinse the Rice: Always rinse your white rice (Jasmine or Calrose are best) in cold water until the water runs clear. This removes excess surface starch, preventing the rice from becoming gummy.
- The Ratio: Use 1.5 cups of water for every 1 cup of rice for a stovetop method, or follow your rice cooker’s specific instructions.
- The Rest: Once the rice is done, let it sit, covered, for at least 10 minutes. This allows the moisture to redistribute, resulting in fluffy grains.
Phase 2: Whisking the Ultimate Teriyaki Sauce
In a small bowl, combine:
- 1/2 cup soy sauce
- 1/4 cup water
- 2 tablespoons mirin
- 1/4 cup brown sugar
- 1 tablespoon honey (for extra stickiness)
- 1 teaspoon freshly grated ginger
- 2 cloves minced garlic
- 1 tablespoon cornstarch
Whisk until the sugar and cornstarch are fully dissolved.
Phase 3: Searing the Chicken
- Prep the Meat: Pat your chicken thighs dry with paper towels. Cut them into bite-sized, uniform pieces.
- The Pan: Use a large skillet or wok over medium-high heat. Add a tablespoon of neutral oil (like canola or grapeseed).
- The Sear: Add the chicken in a single layer. Don’t crowd the pan; cook in batches if necessary. Let the chicken sit undisturbed for 3-4 minutes to develop a golden-brown crust. Flip and cook for another 3 minutes until nearly cooked through.
Phase 4: Bringing it All Together
- Deglaze: Pour the sauce mixture directly into the pan with the chicken.
- The Simmer: As the sauce heats up, it will begin to bubble and thicken almost instantly due to the cornstarch.
- Toss and Coat: Use a spatula to toss the chicken continuously, ensuring every piece is coated in the thickening glaze.
- Finish: Once the sauce has reduced to a sticky consistency that coats the back of a spoon, remove from heat.
Mastering the Rice: The Foundation of the Meal
While the chicken is the star, the rice is the stage. To elevate your bowl to a professional level, consider these rice-cooking tips:
The Best Varieties
- Jasmine Rice: Long-grain and aromatic. It’s slightly floral and holds up well under heavy sauces.
- Calrose/Sushi Rice: Medium-grain and slightly sticky. This is the traditional choice for Japanese-style bowls, as the grains clump together, making it easy to eat with chopsticks.
- Brown Rice: A nuttier, fiber-rich alternative. Note that brown rice requires more water and a longer cooking time (usually 45 minutes).
Flavoring Your Rice
If you want to take the flavor up a notch, don’t just use plain water.
- Coconut Rice: Replace half the water with full-fat canned coconut milk for a creamy, tropical twist.
- Ginger-Garlic Rice: Sauté a bit of garlic and ginger in the pot with the dry rice for one minute before adding the water.
- Seasoned Rice: Add a pinch of salt and a teaspoon of rice vinegar after the rice is cooked to brighten the overall flavor of the dish.
Pro Tips for the Best Results
Don’t Overcrowd the Pan
If you put too much chicken in the skillet at once, the temperature of the pan will drop, and the chicken will release its juices and “boil” rather than sear. You want that brown crust—that’s where the flavor lives.
Balancing the Sauce
Tastes vary. If you find the sauce too sweet, add a teaspoon of rice vinegar or a squeeze of lime juice. If it’s too salty, add a splash more water or a bit more honey. The beauty of homemade Teriyaki is that you are the master of the flavor balance.
Let the Chicken Rest
Even though it’s coated in sauce, letting the chicken sit for two minutes before serving allows the proteins to relax, ensuring the most tender bite possible.
Creative Variations to Try
Once you have mastered the basic Easy Teriyaki Chicken recipe, you can start experimenting with these variations:
1. The Spicy Kick
Add a tablespoon of Sriracha or a teaspoon of red chili flakes to the sauce mixture. The heat pairs beautifully with the brown sugar.
2. Pineapple Teriyaki
Replace the water in the sauce recipe with pineapple juice. Add fresh pineapple chunks to the pan during the last 2 minutes of cooking. This adds a bright, acidic sweetness that is iconic in Hawaiian-style Teriyaki.
3. Sheet Pan Teriyaki
If you are cooking for a crowd, toss the chicken and your favorite vegetables (broccoli, bell peppers, onions) in the sauce and spread them out on a large baking sheet. Roast at 400°F (200°C) for 20 minutes, tossing halfway through.
4. Healthy/Low-Carb Swap
Swap the white rice for cauliflower rice or a bed of sautéed zoodles (zucchini noodles). Use liquid aminos instead of soy sauce and a keto-friendly sweetener like monk fruit to keep the carbs low.
The Perfect Pairings: Vegetables and Toppings
A bowl of Teriyaki Chicken and rice is great, but it’s the additions that make it a complete meal.
Recommended Vegetables
- Steamed Broccoli: The florets act like sponges, soaking up the extra Teriyaki sauce.
- Snap Peas: These add a much-needed crunch and a pop of bright green color.
- Bok Choy: Quickly sautéed with a little sesame oil, bok choy provides a sophisticated, earthy balance.
- Carrot Ribbons: Use a peeler to create thin strips for a visual and textural contrast.
The Finishing Touches (Garnishes)
Garnishes aren’t just for looks; they add final layers of flavor and texture.
- Toasted Sesame Seeds: These add a nutty aroma and a tiny bit of crunch.
- Green Onions: Sliced thin on a bias, they provide a fresh, sharp contrast to the sweet sauce.
- Toasted Sesame Oil: A tiny drizzle at the very end (after the heat is off) provides a deep, aromatic finish.
Nutritional Breakdown: Is Teriyaki Chicken Healthy?
Teriyaki Chicken is an excellent source of lean protein. By making it at home, you have the power to make it a very healthy meal.
- Protein: Chicken thighs and breasts are packed with high-quality protein necessary for muscle repair and satiety.
- Soy Sauce: While high in sodium, fermented soy products contain antioxidants.
- Ginger and Garlic: Both have well-documented anti-inflammatory and immune-boosting properties.
To maximize the health benefits, aim for a 1:1 ratio of chicken and vegetables, and opt for brown rice or quinoa to increase fiber intake.
Meal Prepping Teriyaki Chicken
Teriyaki Chicken is one of the best “meal prep” dishes because it actually tastes better the next day as the chicken continues to marinate in the glaze.
Storage
Store the chicken and rice in airtight containers in the refrigerator for up to 4 days. It is often best to store the rice and chicken in the same container so the rice can absorb any extra sauce.
Freezing
You can freeze the cooked chicken in its sauce for up to 3 months. To serve, thaw overnight in the fridge and reheat on the stove with a splash of water to loosen the sauce.
Reheating Tip
When reheating in the microwave, place a damp paper towel over the rice. This creates steam, which prevents the rice from becoming hard and dry.
Common Mistakes and How to Avoid Them
1. Burning the Sauce
Because Teriyaki sauce has a high sugar content, it can go from “thick and bubbly” to “burnt and bitter” in a matter of seconds. Keep the sauce moving in the pan and turn down the heat once it starts to thicken.
2. Using Too Much Cornstarch
If the sauce becomes a jelly-like glob, you’ve used too much cornstarch. You can fix this by adding a tablespoon of water or broth at a time and whisking vigorously over low heat until the consistency smooths out.
3. Not Drying the Chicken
If your chicken is wet when it hits the pan, it will steam instead of sear. Always pat the meat dry with paper towels before cooking.
Frequently Asked Questions (FAQs)
Q: Can I use frozen chicken? A: Yes, but ensure it is completely thawed and patted dry before cooking. Frozen chicken often releases more water, which can dilute your sauce if not handled properly.
Q: Is Teriyaki sauce gluten-free? A: Traditional soy sauce contains wheat. To make this recipe gluten-free, substitute the soy sauce with Tamari or liquid aminos and ensure your mirin is certified gluten-free.
Q: How do I get my sauce as thick as the restaurants? A: The secret is the combination of sugar reduction and the cornstarch slurry. Let the sauce simmer until it reduces by about 20%, then add the slurry to lock in that thick texture.
Q: Can I make the sauce in advance? A: Absolutely. You can whisk the sauce ingredients together and store them in a jar in the fridge for up to two weeks. Just give it a good shake before pouring it into the pan.
The Science of Umami in Teriyaki
Why is Teriyaki so addictive? It comes down to Umami, often called the “fifth taste.” Umami is the savory flavor found in glutamates. Soy sauce is one of the richest sources of natural glutamates. When you combine this with the sweetness of sugar and the aromatics of garlic, you trigger a biological “satisfaction” response in the brain.
The Maillard reaction—the chemical reaction between amino acids and reducing sugars that gives browned food its distinctive flavor—also plays a huge role. By searing the chicken first, you are creating complex flavor molecules that the sauce then clings to, magnifying the taste experience.
Serving Suggestions for a Full Experience
To turn this simple recipe into a dinner party-worthy feast, consider the following:
- The Appetizer: Start with a bowl of steamed edamame sprinkled with sea salt or a simple miso soup.
- The Drink: Pair the meal with a chilled glass of Riesling (the sweetness complements the Teriyaki) or a crisp Japanese lager like Sapporo or Asahi. For a non-alcoholic option, iced green tea with a hint of honey is perfect.
- The Presentation: Use wide, shallow bowls. Place a generous mound of rice on one side, nestle the chicken next to it, and pile the steamed vegetables in the center. Garnish generously with green onions and sesame seeds.
Conclusion: Bringing the Restaurant Home
Mastering an Easy Teriyaki Chicken recipe is about more than just following steps; it’s about understanding the balance of flavors and the importance of technique. By choosing the right cut of meat, searing for flavor, and whisking your own sauce, you elevate a simple weeknight meal into something truly extraordinary.
This dish is a testament to the fact that you don’t need a pantry full of exotic ingredients to create world-class flavor. With soy sauce, sugar, ginger, and garlic, you have the building blocks of a meal that is loved across continents.
So, the next time you’re tempted to reach for the takeout menu, remember that the best Teriyaki Chicken in town might just be the one you make in your own kitchen. Grab your skillet, start your rice, and get ready to enjoy a bowl of pure, sticky, savory perfection.
Detailed Recipe Card Summary
Prep time: 10 mins
Cook time: 15 mins
Total time: 25 mins
Servings: 4
Ingredients
- Chicken: 1.5 lbs boneless skinless chicken thighs, cut into bite-sized pieces.
- Sauce: 1/2 cup soy sauce, 1/4 cup brown sugar, 2 tbsp mirin, 1 tsp ginger, 2 cloves garlic, 1 tbsp cornstarch.
- Rice: 2 cups Jasmine or Calrose rice (plus water for cooking).
- Garnish: Sesame seeds, sliced green onions.
Instructions
- Rice: Rinse and cook rice according to package instructions.
- Sauce: Whisk all sauce ingredients in a small bowl until smooth.
- Chicken: Sauté chicken in a hot skillet with oil until browned and cooked through (6-8 minutes).
- Glaze: Pour sauce over chicken. Simmer for 2-3 minutes until thickened and glossy.
- Serve: Scoop rice into bowls, top with chicken and extra glaze. Garnish and enjoy.
By following this guide, you are not just cooking a meal; you are continuing a rich culinary tradition. Enjoy the process, and more importantly, enjoy the flavor!